Tips for Installing Lintels
Keystone Lintels has teamed up with Roger Bisby from Skill Builder to provide you with the top 10 tips when installing a lintel.
Play Video
-
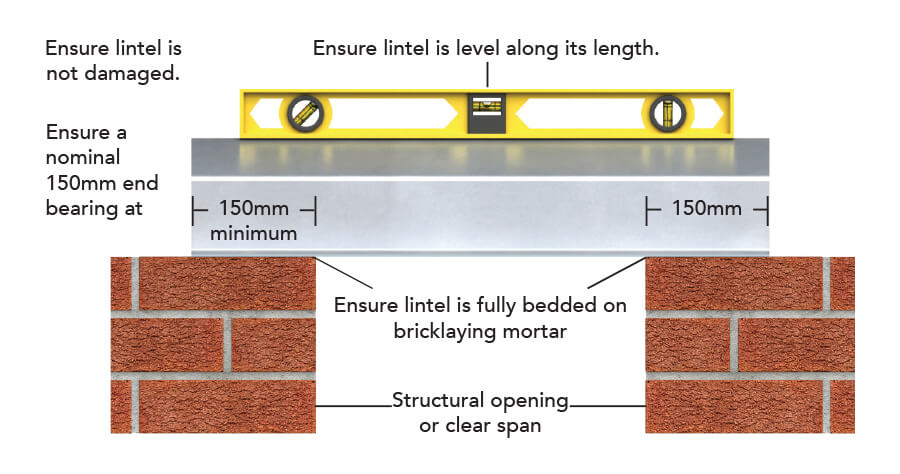
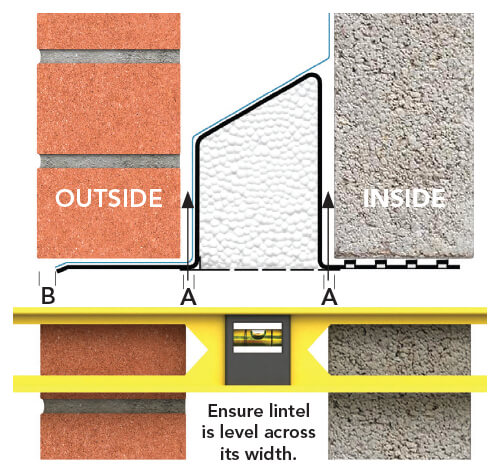
Steel Lintels should be installed with a minimum end bearing of 150mm, bedded on mortar and levelled along its length and across its width.
-
The masonry above the lintel should be built in accordance with BS EN 1996-2:2006.
-
Raise the inner and outer leaves simultaneously to avoid excessive eccentricity of loading, with a maximum height difference of 225mm (Masonry should be laid on a mortar bed and all perpendicular joints should be filled.)
-
Allow the mortar to cure before applying floor or roof loads (Temporary propping beneath a steel lintel is practised to facilitate speed of construction).
-
The NHBC recommend a damp proof course (DPC) or cavity tray should be installed over all openings in external cavity walls.
-
When installing concrete floor units or other heavy components above a lintel, care should be taken to avoid shock loading and floor units should not be dragged into position. Masonry immediately above the lintel should be allowed to cure.
-
Point loads should not be applied directly onto lintel flanges. Steel Lintels should have a minimum of masonry 150mm high between the flange and the application level of any form of loading. Consult Keystone’s technical department if applying a point load above lintels.
-
The external lintel flange must project beyond the window/door frame and it is recommended that a flexible sealing compound is used between the underside of the lintel flange and the frame.
-
When the underside of a lintel is exposed, its appearance can be enhanced by the addition of lintel soffit cladding.
-
Do not cut lintels to length or modify them in any way without consulting an Keystone engineer.
Ensure lintel is level along its length

Lintel position within a cavity wall
 In accordance with BS EN 1996-2:2006 and NHBC requirements all external wall lintels MUST be installed with a flexible damp proof course with the exception of those adequately protected by an eaves overhang or similar form of protection.
-
Lintel should be centred in the cavity and the distance between lintel up-stand within the cavity and masonry must not exceed 10mm
-
Masonry should not overhang any flange by more than 25mm.
Propping

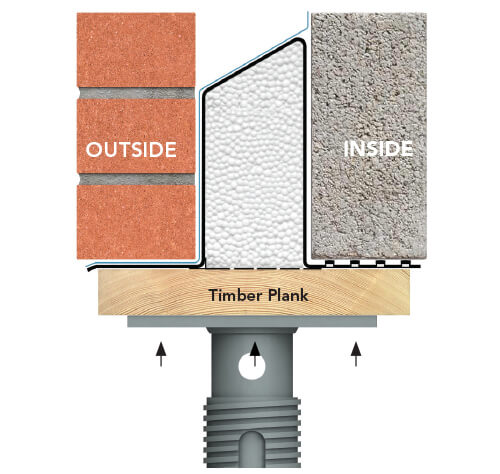
The practice of propping a lintel is sometimes used to facilitate speed of construction. It should only be introduced after initial masonry load has been applied to the lintel.
When propping a lintel, a horizontal timber plank should be placed along the underside of the lintel and suitable* props secured into place at maximum 1200mm centres.
* Suitability of props is the responsibility of site management.

